Google
★★★★★
The door hole was worse than it looked, I tried a quick fix but it sank the next day. They replaced the damaged drywall and didn’t rush drying. The finish is smooth now and the damage is hardly noticeable.
Lisa M
Local Drywall repair Service
That jagged hole in the corner of your drywall isn’t going to fix itself—cracked edges peeling paint, rough surface uneven where the patch was half-heartedly slapped on. You start searching “Drywall patch near me in Westminster” realizing this quick fix won’t blend or hold like it should.
I came home one afternoon to find a good-sized hole in my living room wall—an accidental impact from moving furniture left jagged edges and cracked drywall paper exposed. The damage wasn’t just unsightly but awkwardly placed where natural light hit it, making that patch stand out even more. I knew this wouldn’t be an easy fix; the edges were broken unevenly, not a clean rip.
I searched for a Drywall patch near me and tried to handle it myself. I applied spackle, sanded the area, but the patch paper shrunk unevenly, and seams showed clearly under the light. The texture didn’t match, and the small errors turned that spot into an eyesore—it cast faint shadows no matter how I moved around. I realized this wasn’t a simple fill job; blending texture and paint perfectly by myself was beyond what I expected.
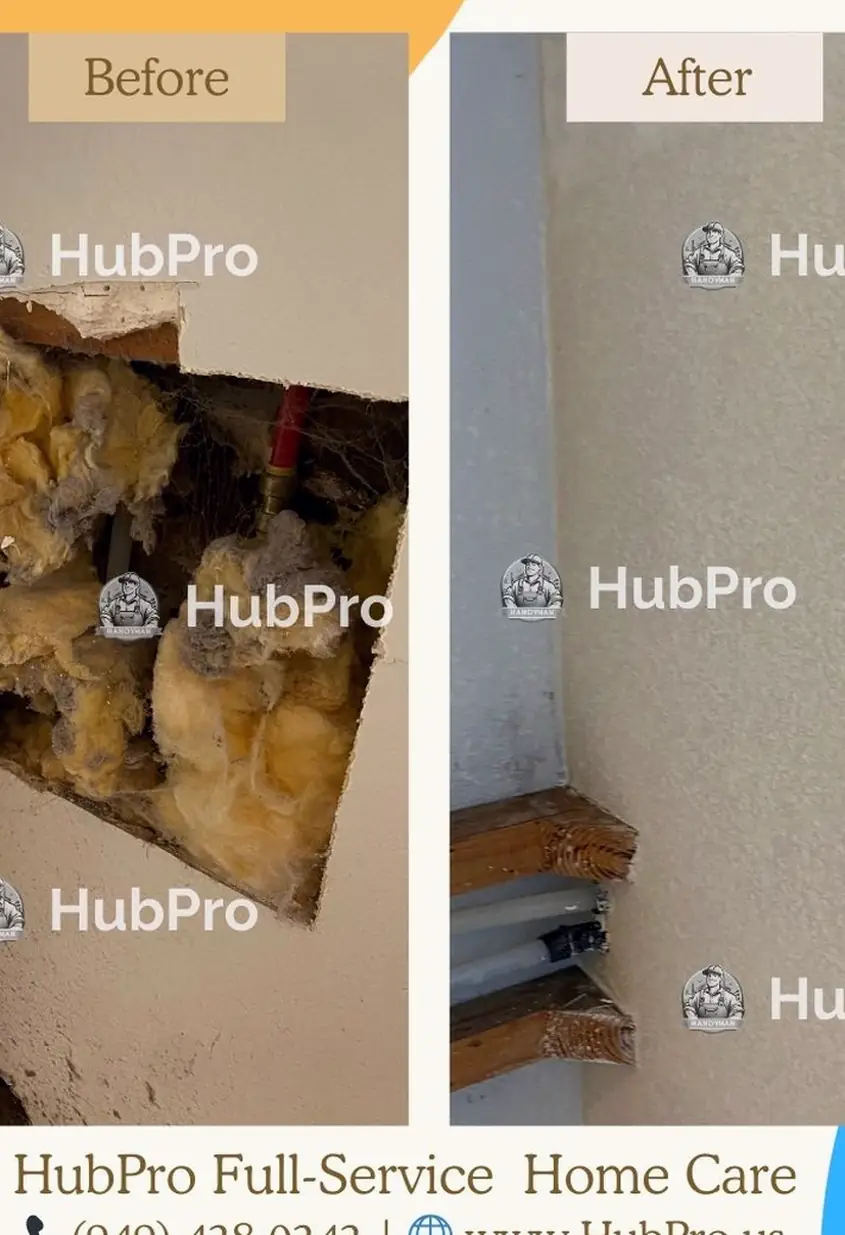
Finally, I called a handyman for a proper Drywall patch near me. They carefully removed loose drywall, feathered compound layers flawlessly, and controlled dust during sanding. With precise texture matching and careful paint blending, the repair disappeared from every viewing angle—no shadow lines, no bumps. The clean and precise finish meant no callbacks, and the job was done right the first time, leaving the wall looking flat and original.
When searching for Drywall patch near me in Westminster, CA, the exact fix begins by addressing impact damage or rough patches with precision to erase visible seams and flaws.
First, the area around the impact is carefully cut to a stable square or rectangle. Loose drywall is removed to prevent future shrinkage or cracking. DIYers often skip this, causing edges that break down or show through after drying.
A drywall piece matching thickness is cut to fit and securely fastened inside the opening. Without this tight fit, poorly installed patches shift, creating uneven surfaces and visible bumps under light reflection.
Joint compound is built up in multiple thin coats, allowing proper drying time between each. Rushing this step results in cracking or shrinking, which reveals lines and imperfections once painted.
Once dry, the patch edges are sanded with controlled dust to blend seamlessly into surrounding drywall. Skipping this creates sharp edges or visible seams that catch shadows, betraying the repair.
The final step is replicating wall texture and applying paint with careful color matching. DIY attempts often cause flashing paint or texture mismatch, making the patch obvious in different light angles.
Common concerns homeowners face with visible drywall damage and why proper Drywall patch near me in Westminster repairs matter for lasting results.
When drywall mud is wet, it hides imperfections but as it dries, it shrinks and can reveal edges or dimples you didn't notice. If ignored, cracks or uneven surfaces show through paint. Proper repair means applying mud in thin layers, sanding smoothly, and sometimes adding a second coat to stabilize the patch and ensure it blends cleanly with the wall.
Paint highlights texture differences and edges especially if the patch isn’t perfectly sanded or the drywall compound wasn’t feathered correctly. Side lighting often exposes this. Ignoring this leads to a patch that keeps popping back visually. Properly fixing this requires blending edges carefully, matching wall texture, and sometimes priming or using a specialized paint technique to hide inconsistencies.
DIY patches often miss subtle details like deep sanding or texture matching which make patches noticeable or cause cracks to return. If the damage is visible and DIY attempts failed, the patch likely won’t hold or blend well, leading to frustration. A handyman ensures clean work with proper materials, multiple coats if needed, and texture blending for a stable, no-callback repair.
Visible damage that needs more than just filling—like sanding, texturing, and blending—takes time and skill. Cheap quick fixes often don’t last and become more visible, driving future costs up. Proper repair accounts for drying times, prepping edges, and multiple finishing steps to ensure the patch disappears and stands the test of time, which all affects pricing.
If damage is deep, cracked, or spans a large area, a simple patch won’t hold or blend well. Visible damage sometimes means the drywall tape underneath failed or the wall needs replacing sections. Ignoring this risks the patch popping or cracking again. A proper fix might mean replacing drywall pieces, applying tape carefully, then mudding and finishing to get a clean, durable wall.
Drywall texture is affected by how light hits the wall; side or natural light can make slight bumps or sanding marks visible. If the texture isn’t matched or blended well, the patch stands out despite paint. Leaving this means the damage won’t disappear visually. Proper repair includes matching drywall texture with the existing wall and fine sanding to keep the surface uniform under all lighting.
A patch that’s not done thoroughly—poor sanding, missed priming, or uneven texture—can crack or yellow, making the damage visible again. Small repairs can fail repeatedly. For a long-term fix, repairs need clean application, gradual drying between coats, careful blending, and proper priming to ensure the patch remains stable and hidden for years.
Top-Rated Drywall repair — 5 Stars on Yelp & Google
Discover trusted Drywall patch near me in Westminster with verified local reviews showcasing realistic drywall repair experiences, from paint issues to texture fixes.
★★★★★
The door hole was worse than it looked, I tried a quick fix but it sank the next day. They replaced the damaged drywall and didn’t rush drying. The finish is smooth now and the damage is hardly noticeable.
Lisa M
★★★★★
I thought my DIY patch held, but the texture didn’t match and edges cracked. The handyman explained the process, came back for a second pass, and matched the wall’s uneven surface perfectly.
Chris D
★★★★★
Paint didn’t blend after my first repair job so the patch looked obvious under sunlight. They carefully did drywall and paint—adjusting mid-job until the color faded naturally without drawing attention.
Andre P
★★★★★
Soften drywall by the corner caused the patch to bubble. Instead of a quick cover-up, they did structural repair and sanding. Showed up on time, kept dust contained, and no callbacks needed afterward.
Maya K
★★★★★
Multiple dents from previous bad repairs were uneven and had bad seams. Crew managed the area cleanly and took their time with blending; I thought it was fine at first, but the surface feels solid now.
Sarah
★★★★★
I was hunting for Drywall patch near me in Westminster after a bad DIY job failed. They provided sheetrock repair, explained every step, and controlled dust better than anyone I’ve seen.
Jared O
★★★★★
This was my second time using their drywall repair services. Previous patch had flashing paint and a weird texture. This time they took extra care, came back for a second pass, and now the wall’s surface is even.
Theresa L
★★★★★
After a rough drywall installation left crooked edges, they fixed the seams and patched holes carefully. No rushing, explained the drying times, and kept everything tidy. The problem spots don’t draw eyes anymore.
Ben H
When searching for a Drywall patch near me in Westminster, CA, the visible damage and past repair attempts often dictate the true effort behind the price. Fixing rough openings with mismatched textures takes skill and patience to blend perfectly.
$150+
Small patches require careful prepping to remove failed DIY material and smooth edges. One compound layer with drying lets us ensure a clean, tight finish that won’t show later.
$280+
Medium repairs often expose rough openings needing multiple compound layers and drying cycles. These steps and return visits create a seamless texture match without obvious patches.
$420+
Large damage with mismatched texture demands extensive prep, several compound coats, and careful blending visits. This thorough process guarantees a flawless finish done right the first time.
In Westminster homes, what starts as small dents or dings can quickly spiral into noticeable drywall damage. If you’re searching for Drywall patch near me, understanding how these issues escalate helps recognize the severity sooner.
A sudden nudge from a chair or door handle often leaves shallow dents or tiny holes. While minor, these spots disrupt the wall’s smooth texture and seldom blend seamlessly after a quick patch.
Intentional cuts made for plumbing or electrical lines often leave uneven edges around the drywall. These openings challenge simple fixes as the area lacks uniform surface, making blends tricky.
Removing heavy TV brackets or wall anchors pulls chunks away, causing ragged holes or flaky drywall paper. These spots visibly break texture and often resist clean touch-ups.
Small shifts in framing create fine cracks or corner breaks which start subtle but spread with time. These fractures fracture wall integrity and rarely fix completely without professional care.
Homeowners often ask about these drywall issues during the same visit.
HubPro also handles these home repair tasks in Westminster when you need more than drywall repair.
When a Drywall patch near me is needed, we handle those cracks, dents, and holes just like in Westminster. Whether it's a small nick or a bigger patch, we keep the process smooth and quick, making sure your walls look seamless again without long waits or disruption close to home.
Based in Westminster, our drywall repair service focuses on visible wall damage including patch work and finish work. We plan jobs to stay close by, typically handling clusters within Orange County to keep trips short and efficient. Smaller repairs are done quickly with the option for return visits if needed, balancing workload and travel time to maintain steady scheduling.
Expanding beyond Westminster, we regularly cover nearby towns where shorter drives allow grouping drywall repairs for practical scheduling. Garden Grove and Fountain Valley.