$150+
Small Repair
Simple prep with minor sanding and one compound application. Quick drying cycle, usually done in a single visit. Clean finish ensures the patch blends with the wall without uneven texture.
Local Drywall repair Service
That rough, chipped edge where the drywall got smashed—it’s not just the gaping hole but how the paint peels around it and the surface feels uneven. You think a quick patch might do, but anyone who’s worked with Drywall installers in Westminster knows those fixes rarely match up perfectly.

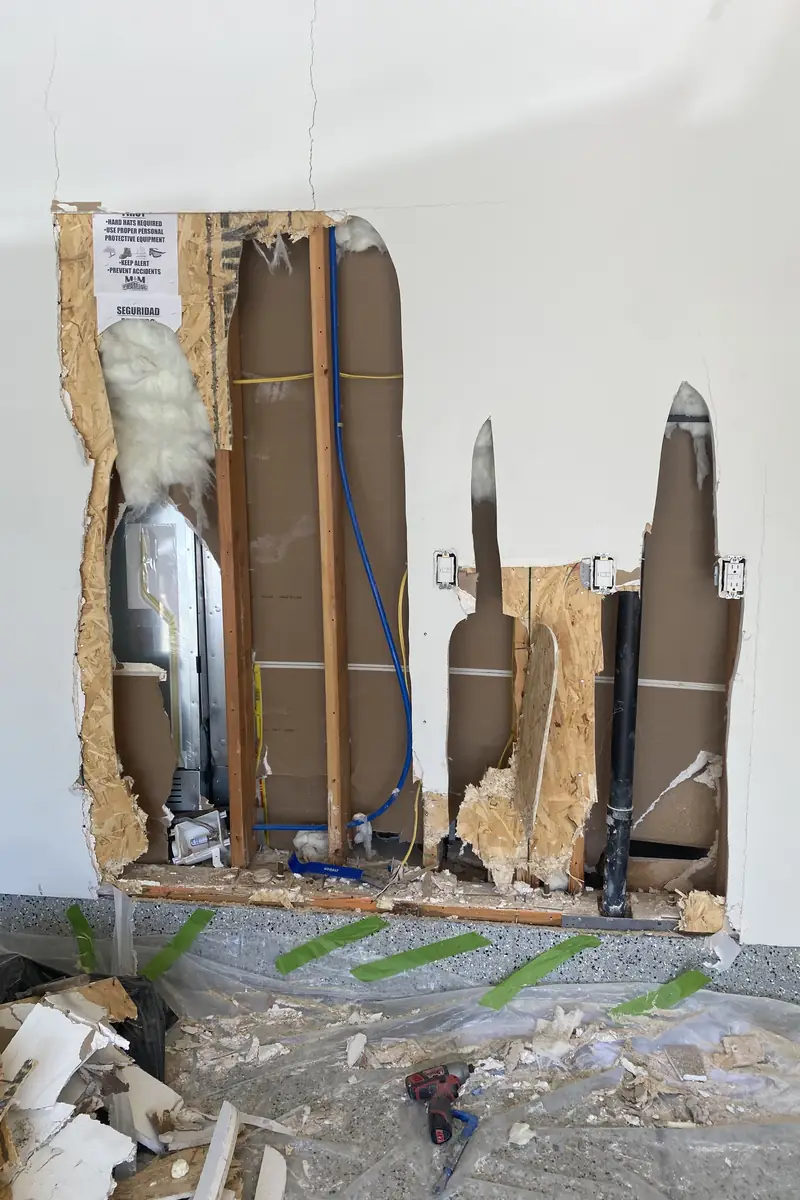
The moment I noticed the wall—a gaping hole with jagged edges near the doorway—I knew this wasn’t just another dent. The impact left exposed drywall crumbs and some broken tape fraying loose. It was impossible to ignore, and every time light hit just right, the damage seemed to mock me, turning an everyday corner into an eyesore I dreaded.
I tried patching it myself, thinking it would be simple. A layer of compound, some sanding, and I was done—or so I thought. The patch shrank as it dried, seams reappeared, and the paint didn’t quite match, leaving a shadow where none should be. No matter how much sanding and re-coating, the uneven texture caught the light differently, making the repair obvious and frustrating.
Calling in Drywall installers was the right move. They worked meticulously, feathering compound layers and matching textures perfectly. Their process kept dust minimal and the workspace clean—no mess to deal with afterward. When they finished, the wall was entirely flat, no shadow lines anywhere, just a smooth surface that blended naturally with the rest. It was clear—they do small jobs with precision, no callbacks, and it was done right the first time.
In Westminster, Drywall installers face unique challenges fixing visible patches caused by failed DIY jobs, rough openings, and mismatched textures. This drives pricing to ensure work that truly blends and lasts.
$150+
Simple prep with minor sanding and one compound application. Quick drying cycle, usually done in a single visit. Clean finish ensures the patch blends with the wall without uneven texture.
$280+
Failed DIY spots need extra prep to remove damaged material and smooth rough edges. Multiple compound layers with drying cycles and a follow-up visit guarantee no visible seams.
$420+
Rough openings and mismatched textures require detailed blending, several compound passes, extended drying, and multiple visits. This work creates a flawless finish that looks original.
Top-Rated Drywall repair — 5 Stars on Yelp & Google
Reliable Drywall installers in Westminster helped fix a variety of drywall issues including holes, texture, and paint inconsistencies with precise craftsmanship.
★★★★★
Had a door hole that I tried fixing myself but the edges looked rough. They did a sheetrock repair that sanded the edges down well and it’s barely noticeable now.
Anna L
★★★★★
A failed DIY patch left bubbling texture and cracks. Their drywall repair services blended the surface so the rough spots disappeared and didn’t rush drying.
Chris D
★★★★★
Paint mismatch after my previous repair was driving me nuts. They did drywall and paint that matched the old wall color and finished the sequenced drying properly.
Mia S
★★★★★
The wall texture was uneven with noticeable ridges from a prior job. They carefully patched and textured the surface so it now blends under light—no callbacks needed.
Ethan R.
★★★★★
Soft drywall around a corner was sinking days after a quick patch. They came back for second pass and explained what he was doing while keeping the area clean.
Sophia H
★★★★★
Looked for drywall patch near me after a dent I made. They didn’t just slap it on, controlled dust really well, and the finish doesn’t draw attention anymore.
Jacob
★★★★★
I found some Drywall installers in Westminster after a poor attempt left a bad patch. They redid the whole section with new drywall installation, and it now looks solid.
Olivia Benson
★★★★★
Previous handyman rushed and left flashing paint and uneven sanding. This team showed up on time, fixed the seams carefully, and the surface now looks natural.
Liam K.
In Westminster homes, drywall issues often begin subtly but worsen quickly. Understanding how these faults originate is key for anyone seeking Drywall installers to address escalating damage.
Repeated contact from swinging door handles can leave shallow dents and cracked paint on drywall surfaces, leaving uneven edges that hint at deeper damage beneath the surface.
Small, rough openings made to run new plumbing or electrical lines create visible gaps or jagged edges, which rarely align perfectly with existing wall texture and compromise the wall’s integrity.
Heavy brackets sometimes drag anchors from drywall, leaving chunks missing or holes with ragged edges that make straightforward patching nearly impossible without noticeable flaws.
Tiny hairline cracks appear near corners or seams as homes shift slightly. These fissures can split into larger breaks, disrupting original smooth finishes and causing paint to flake unpredictably.
Homeowners often ask about these drywall issues during the same visit.
HubPro also handles these home repair tasks in Westminster when you need more than drywall repair.
When a drywall crack or dent shows up, we handle repairs the same way in Westminster and nearby neighborhoods, fixing patches so the wall looks smooth again. Whether it’s a small hole or water damage, we’re ready to schedule quickly and keep your walls in good shape just down the street.
Our drywall repair service is centered in Westminster, focusing on small patches, visible wall damage, and finish work that often needs quick visits or follow-ups. We typically group jobs nearby so travel stays manageable within Orange County limits. This approach helps us handle repairs efficiently while keeping scheduling flexible, especially for return trips on touch-ups or additional finishing.
Beyond Westminster, we often schedule repairs in close-by parts of Orange County where short drives make it easy to combine jobs and stay timely with touch-ups and patch work. Garden Grove and Fountain Valley.
Common drywall repair concerns homeowners face after visible wall damage, explained with practical details to guide proper fixes and avoid repeat issues.
You’ll see the patch smooth when wet, but as it dries it shrinks causing cracks or edges. This happens because the joint compound wasn’t applied in thin layers or allowed enough drying time. If ignored, cracks widen and show repeatedly. Proper repair means multiple thin coats with adequate drying, then sanding and sealing before painting to prevent return damage.
If the patch shows after painting, it’s often because the texture or feathering was off. Light hitting the wall from the side reveals unevenness or edges where the patch meets original drywall. This happens when sanding is uneven or the texture isn’t matched properly. Ignoring this leaves an obvious patch line. The fix is blend sanding and reapply texture to match original, then paint with proper priming.
DIY may look okay at first, but visible damage needs careful prep: removing loose material, proper mud application, and texture matching. Many homeowners find the patch cracks or edges show after a few days because they rushed drying or sanding. Improper fix means repeat work and frustration. Drywall installers in Westminster have experience ensuring a stable, smooth finish that lasts with no callbacks.
Repeat damage happens when the patch is just a fill without reinforcing or addressing underlying causes like moisture or structural movement. You might see new cracks or peeling as paint separates. Simply filling cracks won’t fix instability. Proper repair involves removing damaged drywall if needed, proper mud layers, and ensuring wall stability so the patch doesn’t fail again.
Small dings can be patched, but when damage is deep or spans more than a few inches, patches aren’t enough. You’ll see edges lift or cracks soon after because the drywall beneath is compromised. Ignoring this makes damage more visible over time. The right way is cutting out the damaged section and installing new drywall before mudding and texturing, which gives a clean, durable finish.
Side lighting highlights even small variations, so a patch that didn’t match texture exactly becomes obvious. If texture is too smooth or rough compared to original, shadows and light reveal it. Ignoring texture variation leaves a patch that looks out of place. Proper repair blends texture carefully with sanding and touch-up texture products before painting under the same lighting conditions to ensure a seamless look.
DIY patches often fail long term because the mud isn’t layered or sanded properly, causing cracks and peeling paint. You might see the patch looking good first, but weeks later edges lift or new cracks form. Professionals apply multiple coats, sand between them, and prime correctly to ensure durability. Doing it right prevents frustrating callbacks and keeps your wall looking clean and stable for years.
When Drywall installers tackle impact damage or visible seams, they follow a precise process to erase imperfections seamlessly without rushed drying or patchy edges, ensuring a clean, flawless finish.
Cut away loose or broken drywall precisely, removing rough edges to create a stable base. Skipping this leaves unstable patches prone to crumbling or uneven texture under light.
Fit a drywall patch flush to the wall’s surface, securing firmly. DIY often results in gaps or bulges causing visible shadows and seams that stand out in natural light.
Apply joint compound in thin, even layers, allowing full drying between coats. Rushing this step leads to shrinkage cracks and patch failures, making imperfections visible from different angles.
Gently sand multiple times, feathering edges to blend patch into wall texture flawlessly. Skipping careful sanding leaves lines or ridges that catch light and highlight the repair.
Recreate wall texture precisely before painting to hide any trace of repair. Poor texture or paint mismatches cause flashing spots under reflectance, revealing the once damaged area.