Impact from Door Handles
Repeated swinging of door handles leaving shallow dents or chipped edges can initially seem trivial, yet these marks start the erosion of the drywall surface and create unsightly imperfections.
Local Drywall repair Service
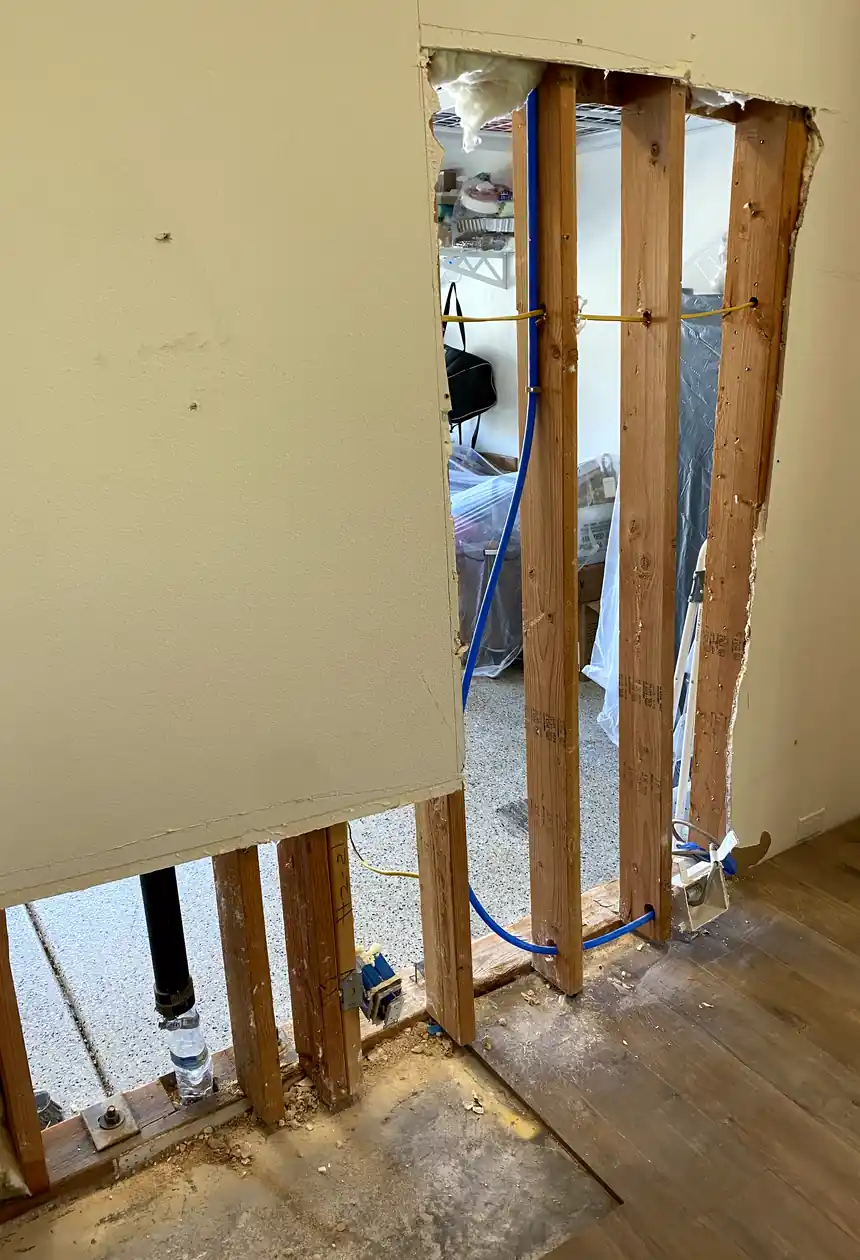
That jagged hole in your wall, with paint peeling around the chipped edges, didn’t appear overnight—you just noticed it, and the rough, uneven surface makes it worse than you thought. Quick patches rarely match, and what started as a simple Drywall installation in Westminster now feels like a real hassle you can’t ignore.
Last week, a heavy chair accidentally slammed against the living room wall, cracking through the drywall and leaving a jagged hole with uneven edges. The damage was obvious, and every time sunlight hit that corner, the broken contours stood out harshly against the smooth surface nearby. I knew the repair had to be precise because the crack wasn’t just surface deep—it exposed the framing beneath, making the whole room look neglected.
I tried patching the hole myself, thinking it’d be a simple job. But as I layered joint compound, the patch shrank and the edges remained visible under different light angles. The seams didn’t blend, and sanding only highlighted the unevenness. No matter how much I tweaked, I couldn’t match the original texture or feather the edges right. It became clear the DIY fix wasn’t going to hold up, and with time, the patch looked worse, especially as shadows drew out every imperfection.
Calling in a pro for Drywall installation saved the day. The handyman controlled dust throughout the job, carefully cut and fit new drywall to match the damaged section, then applied multiple compound layers with feathered edges—taking time to sand precisely between coats. The result was a flat, uniform surface free of shadow lines or texture mismatches. Even under bright light, there’s no sign of the prior damage. They got it right the first time—clean, seamless, and no callbacks needed. This kind of small but exacting job really requires professional Drywall installation skill to look invisible from every angle.
Common homeowner questions about visible drywall damage and repairs after Drywall installation in Westminster, focusing on realistic concerns and proper fixes.
When a patch seems wet then shrinks after drying, it’s usually drywall mud not dried thoroughly before sanding. This causes uneven surfaces that get worse with paint. Ignoring this leaves the repair visible and flaky. Proper fix means letting each coat dry fully before sanding to smooth and blend cleanly.
If you see the patch outline after paint, often the texture or sanding wasn’t matched well. Paint can highlight edges if the surface isn’t feathered out. Over time, light from windows or lamps makes this stand out. The right fix involves carefully sanding edges and recreating the original wall texture before painting to blend and hide the repair.
DIY patches might look okay at first but without proper mud layers, sanding, and texture blending, cracks or edges reappear. Many homeowners try fixing visible damage but end up with recurring issues or rough patches. A skilled handyman ensures clean work, no callbacks, and a stable result that lasts longer, especially on tricky Drywall installation in Westminster.
Visible wall damage can hide issues like uneven drywall behind or deeper moisture. Pros charge to remove all damaged material, apply multiple coats with drying time, sand carefully, and match texture. Cutting corners saves time but your patch will fail again or pop out. Proper repair means durable blending with no visible seams under different light.
If the damage is large, water-related, or deep, just patching the surface will fail. The area beneath might be weak or moldy. Ignoring this causes cracks or bubbling to return. Proper fix involves cutting out damaged drywall, replacing with new board, mudding, sanding, texture matching, and repainting. This ensures the repair won’t keep coming back.
Even if a patch is smooth, side lighting can reveal different textures or edges. This happens if sanding stops short or texture isn’t matched exactly to the old wall. Over time, these imperfections become more obvious. A proper repair blends mud seamlessly with the surrounding texture and is checked under various lighting before painting for a clean, durable finish.
Poorly done repairs crack or peel as drywall moves or settles. Visible damage may seem fixed but if the patch wasn’t prepped well—like sanding edges or applying enough coats—the fix won’t hold. Proper repair means stable layering, perfect blending, and clean painting, ensuring it won’t keep coming back or get more visible over time.
Based in Westminster, drywall repair work focuses on visible wall damage, patch work, and finish touches that usually take short visits. Jobs in Orange County are handled within a practical radius to keep return trips manageable and schedule tight. This helps group smaller tasks nearby, making repairs more efficient without stretching travel too far.
Working beyond Westminster, drywall repairs naturally extend to spots nearby that fit well within a single day’s routing and follow-up visits. Garden Grove and Fountain Valley.
When walls in Westminster show cracks or dents, drywall repair and installation are handled with care just across town. Whether it's a small patch or a full sheet replacement, nearby homes get quick attention to restore smooth surfaces without long waits, keeping local walls sturdy and looking right.
Homeowners often ask about these drywall issues during the same visit.
HubPro also handles these home repair tasks in Westminster when you need more than drywall repair.
In Westminster homes, Drywall installation often begins with small impacts that seem harmless but escalate into bigger damage. Understanding these stages helps recognize how minor issues can evolve.
Repeated swinging of door handles leaving shallow dents or chipped edges can initially seem trivial, yet these marks start the erosion of the drywall surface and create unsightly imperfections.
Cutting drywall for plumbing or electrical lines causes visible uneven edges and rough openings, which seldom align perfectly, making the damage harder to disguise later on.
When wall anchors or TV mounts loosen or pull out, they leave jagged holes and torn paper layers, often too large or irregular for seamless quick fixes.
Subtle shifts in framing or settling provoke fine cracks along corners or seams, slowly breaking paint and texture—these gradual breaks often worsen unnoticed until quite severe.
In Westminster, Drywall installation pricing reflects the real effort to fix visible patches, rough openings, and texture mismatches you can't just cover up. True repairs reveal what it takes beyond just filling the hole.
$150+
Basic prep, one compound layer, and a single drying cycle suit minor visible patches. Proper blending avoids quick fixes that peel or crack, ensuring a clean, durable finish.
$280+
Failed DIY or medium holes need extra prep and two compound layers with multiple drying cycles. This stops texture mismatches and guarantees a seamless look without return visits.
$420+
Rough openings and mismatched textures require extensive prep, three or more compound layers, plus careful finish blending. Multiple visits ensure the repair is truly invisible and lasting.
Top-Rated Drywall repair — 5 Stars on Yelp & Google
Handyman experts delivering precise Drywall installation in Westminster, blending patches and textures for seamless wall finishes.
★★★★★
Had a weird hole near the door frame; tried patching myself but it ended looking lumpy. The pros fixed the sheetrock repair so it doesn't catch the eye anymore.
Marlene K
★★★★★
Previous drywall repair services left an uneven seam that stuck out under sunlight. They explained each step, came back for a second pass, and now it’s nearly invisible.
Luis
★★★★★
Paint didn’t match after a patch job from another crew. This team sanded carefully and refreshed the drywall and paint so the wall now looks consistent, no shiny spots.
Anna L
★★★★★
Surface texture on my living room wall was off after a patch job; it flaked after a few days. The handyman controlled dust and redid the texture blend properly.
Chris D
★★★★★
A soft drywall area from a leak looked awful. What seemed a quick fix ended up needing more than a patch. They showed up on time and now it feels solid with an even finish.
Felicia R
★★★★★
I searched for drywall patch near me for a cracked edge. They didn’t rush drying, came back for a second coat, and the wall looks smooth without visible joints now.
John H
★★★★★
Trusted them again since they kept the area clean last time. This drywall repair services job was neat—dust controlled and no callbacks needed after the repair settled.
Samantha P
★★★★★
Found a dent in the sheetrock, thought a quick DIY would work but it sank the next day. They explained all fixes and the texture matches so well I don’t notice it anymore.
Tony V
Our Drywall installation process tackles impact damage, rough patches, and visible seams head-on to erase imperfections and ensure a flawless finish.
We carefully remove loose debris and stabilize the damaged section to prevent shrinking or cracking later. DIYers often skip this, causing unstable patches that show under light.
A precise patch is cut and installed to match the surrounding drywall thickness perfectly. Poorly cut or rushed fitting leads to uneven edges and obvious seams that become visible with shifting light.
Joint compound gets applied in thin, controlled layers with drying time between each to avoid shrinkage or bubbling. Rushing this stage often leaves shrink marks or uneven surfaces.
Using fine sanding with careful dust control, edges are feathered to blend seamlessly with existing drywall. DIY sanding often leaves rough spots or visible edges under direct lighting.
Final texture is recreated and painted to integrate perfectly with the wall, eliminating reflection flashes or shadow lines. Poor matching here results in patchy spots clearly visible after paint dries.