Impact from Door Handles
A sudden door swing leaves repeated dents and chips along walls, often with uneven craters or shallow holes just where the handle strikes, making surfaces tough to restore seamlessly.
Local Drywall repair Service
That chunk of drywall near the doorway just took a hard hit—edges chipped, paint cracked, and a hole that’s definitely not hiding behind the furniture. You think a quick patch could fix it, but Drywall installation in Stanton is trickier than it seems when the surface’s uneven and the damage’s this rough.
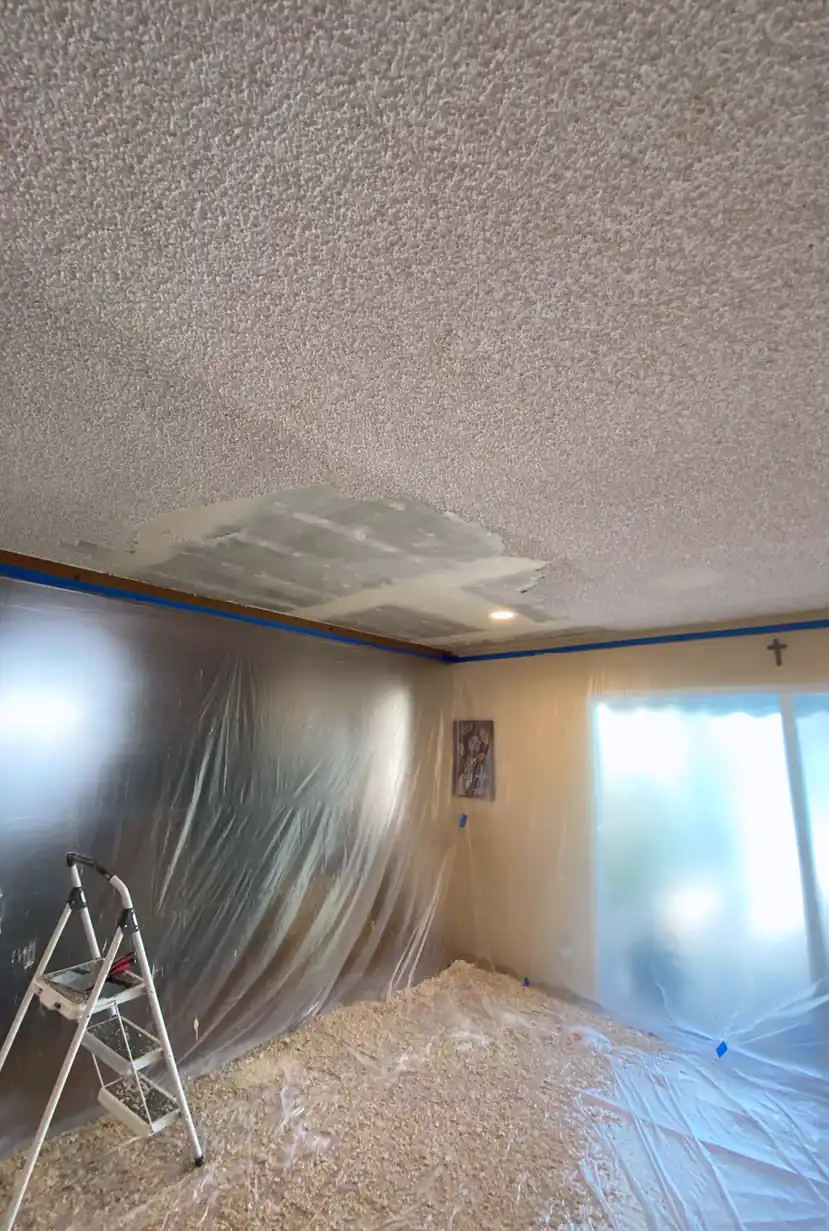
I was staring at the jagged hole in the corner of my living room wall—bad luck from moving furniture carelessly scratched it down to the drywall’s core, with broken edges that just begged for attention. The crack ran into the drywall paper, and the surrounding area felt fragile, ready to crumble more if poked. I knew ignoring it would only invite bigger issues, especially with the evening light emphasizing every flaw.
Thinking I could fix it myself, I grabbed some joint compound and a patch kit. After a few sanding attempts, the patch shrank and cracked again, and the seams just caught the sunlight wrong, casting faint shadows. The painted surface never matched the surrounding wall, and no matter how I feathered the edges, the texture stayed off. I realized this small job wasn’t as simple as it looked—the subtle variations in drywall thickness and light reflection made every imperfection stick out.
Calling in a pro for Drywall installation was the best move. The handyman controlled dust meticulously and layered the compound with care, sanding between each application so the patch blended seamlessly into the original wall. The paint matched perfectly, with no shadow lines or raised seams visible from any angle. The result was flawless and flat, and exactly the clean, durable repair this wall needed—done right the first time, no callbacks.
In Stanton homes, small dents or holes often mark the beginnings of drywall trouble. What starts with minor blemishes can quickly turn into complex damage hard to disguise after Drywall installation.
A sudden door swing leaves repeated dents and chips along walls, often with uneven craters or shallow holes just where the handle strikes, making surfaces tough to restore seamlessly.
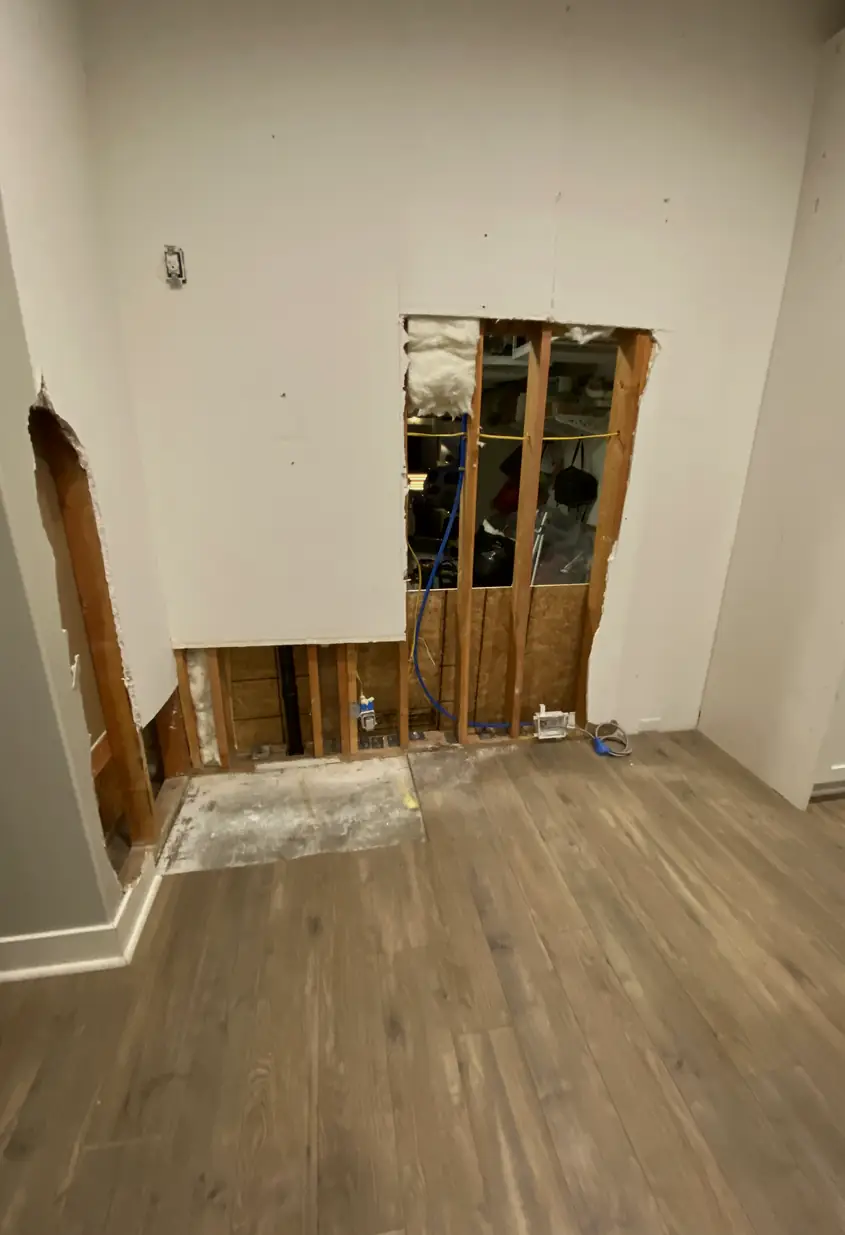
To reach plumbing or wiring, precise but invasive cuts create sharp-edged openings. These rectangular patches rarely align perfectly with existing texture, showing clear evidence of interior work.
TV brackets and heavy shelves demand strong anchors, which sometimes pull out entire drywall chunks, leaving ragged holes and torn paper surfaces impossible to hide with simple spackle.
Over time, house settling causes subtle drywall shifts, resulting in spiderweb cracks and crumbling corners. These fractured lines grow larger, undermining the wall’s smooth, uniform finish.
Homeowners often ask about these drywall issues during the same visit.
HubPro also handles these home repair tasks in Stanton when you need more than drywall repair.
When you notice cracks or dents in drywall around Stanton, the same quick repairs carry over to nearby areas where small walls get patched and prepped for a smooth finish. Whether it’s a door frame or a hallway bump, local jobs get prompt attention to restore walls without waiting.
Based in Stanton, drywall repair work is focused on visible wall damage, patching, and finish touch-ups that usually involve small visits. Nearby jobs within Orange County are scheduled efficiently by clustering stops nearby to minimize travel, with return trips planned when finish work requires drying time. This practical approach helps manage workload across the area while keeping shorter drives manageable.
Service extends to neighboring cities within short driving distances, fitting into local schedules for timely drywall repairs. Garden Grove and Westminster.
Common questions homeowners face after seeing visible drywall damage and attempting repairs, explained with real scenarios and clear guidance.
When drywall mud dries, it shrinks and can pull away from the edges, causing visible cracks. This happens because the patch wasn’t properly feathered or multiple thin coats weren’t applied. Ignoring this leads to cracks reopening and more damage. Proper repair involves several thin layers, sanding in between, and a final smooth finish to prevent shrinkage lines.
If the patch isn’t sanded flush or the texture doesn’t match the surrounding wall, side lighting will highlight edges and seams. This happens because the paint reveals any unevenness beneath it. Leaving it as is makes the repair obvious and unsightly. Fixing this requires careful sanding, matching the wall texture, and blending paint evenly for a clean, nearly invisible repair.
Many try DIY patches, but when damage is extensive or edges are unstable, amateur repairs often crack again or show uneven texture. Patching over damaged drywall hides problems temporarily, but the repair won't hold. Proper Drywall installation in Stanton involves prepping the area, using drywall tape, and applying mud professionally to ensure durability and a clean finish.
Quick fixes skip steps like proper mud application or taping, causing patches to fail quickly. The damaged area then needs redoing, often bigger than the original spot. This cycle wastes time and money. Investing in a careful, clean drywall repair upfront avoids callbacks and gives a stable result that lasts longer.
If the damage extends beyond the surface—like crumbling edges or water damage—a small patch won’t hold or blend properly. Ignoring this makes the problem worse and more visible over time. A proper fix involves cutting back to solid drywall and replacing sections before applying mud, ensuring a strong, long-lasting repair.
Wall texture varies and can change appearance with side lighting, making even slight mismatches very visible. DIY repairs often miss details like grain, spray pattern, or thickness. Leaving it inconsistent draws attention and highlights flaws. Proper repair requires replicating the exact texture and blending edges so the patch disappears in all lighting conditions.
Patches done without taping or with poor mud application often crack or bubble over time. This failure happens because the joint isn’t stable. Ignoring proper steps leads to repeated fixes. Durable drywall repair means using joint tape, applying mud in layers with sanding, and ensuring clean, blended edges for a repair that stands up to daily wear.
Our Drywall installation process in Stanton, CA directly addresses impact damage, rough patches, and visible seams for a flawless finish you won't see. Precision and proper sequencing are key to avoid shadowing and uneven textures.
We start by carefully defining the damaged drywall section and removing loose material to stabilize the patch zone. Rushing here risks unstable edges that cause visible cracks or sinking later. DIY often misses this, leading to shifting patches.
Next, a clean, precise drywall piece is cut to fit snugly within the defined hole. Poor fitting leaves gaps that show through paint under different lighting angles. Professionals ensure exact measurements for an invisible base layer, something hard to achieve without skill.
We build compound in thin, controlled layers allowing ample drying time between coats. Rushed drying or thick application causes shrinkage and cracks that become evident as shadows. DIY fixes often skip layers, resulting in uneven surfaces.
After drying, careful sanding blends edges seamlessly into surrounding drywall, removing ridges that catch light and reveal repair lines. Without patience and proper dust control, edges remain harsh and visible. This step prevents patch outlines often seen in DIY jobs.
Finally, texture is replicated and matched precisely before applying paint blended with the existing wall. Skipping texture or poor paint blending causes patches to flash under room lighting. Controlled dust and clean work ensure no rework or callbacks.
Top-Rated Drywall repair — 5 Stars on Yelp & Google
Our team specializes in expert Drywall installation in Stanton, ensuring every surface is smooth, clean, and finished with care.
★★★★★
Big hole from a door knob busted my hallway drywall and my first patch just bubbled. They fixed it right, sanding and texturing so it barely catches light.
Chris D
★★★★★
Tried a quick patch myself but the edges cracked and chipped next day. These drywall repair services showed up on time, controlled dust, and came back for a second pass—no callbacks.
Anna L
★★★★★
Noticed bad paint match after some water damage patching done by someone else. The handyman explained what he was doing, repaired the surface, then blended drywall and paint flawlessly.
Jeffrey M
★★★★★
Had uneven texture left by a previous fix on my living room wall. They didn't rush drying, needed an extra sanding round, but the finish now is consistent and doesn’t draw attention.
Mara S
★★★★★
The drywall had gotten soft and started sagging near the kitchen cabinet. They ended up needing more than a patch, replaced the bad section, kept the area clean, and my wall feels solid again.
Lucas
★★★★★
Looked for drywall patch near me after my kid punched a dent in the bedroom wall. The guy showed up on time, explained the process, worked carefully, and my wall looks good under light now.
Rachel T
★★★★★
Called them back because my old drywall repair had seams that showed up weirdly. They returned promptly, did a careful sanding and a second paint coat, and now it’s much less noticeable.
Brian C
★★★★★
Needed sheetrock repair for a cracked corner. The repair took a couple of visits, with drying time respected, and dust under control. I thought it was fine at first, but they patiently fixed the finish.
Sophia P
In Stanton, Drywall installation pricing reflects what it actually takes to fix visible patches, failed DIY attempts, rough openings, and texture mismatches you see now. Each repair requires precise prep, compound layering, and drying to ensure a flawless finish—done right the first time.
$150+
Simple patches need careful prep to clean edges and a single compound layer. Faster drying allows a return visit for sanding and finish, ensuring a smooth, clean repair that blends well.
$280+
Repairs after failed DIY or rough opening fixes require extra compound layers and more drying cycles. Multiple visits help properly feather edges, preventing visible lines and guaranteeing durability.
$420+
Fixing mismatched textures demands intensive prep, several compound passes, and meticulous blending with surrounding areas. This thorough approach avoids future callbacks and makes the patch disappear completely.