Impact from Furniture
A careless bump of a door handle or shifting furniture leaves small dents or cracks, subtle flaws that often go unnoticed until they spread into more visible fractures.
Local Drywall repair Service
That jagged hole in the corner of your wall, with chipped edges and uneven surface, is staring right at you—Drywall installation in Mission Viejo might seem simple, but a quick patch won’t match the texture or paint, leaving that rough spot out of place and harder to fix later.
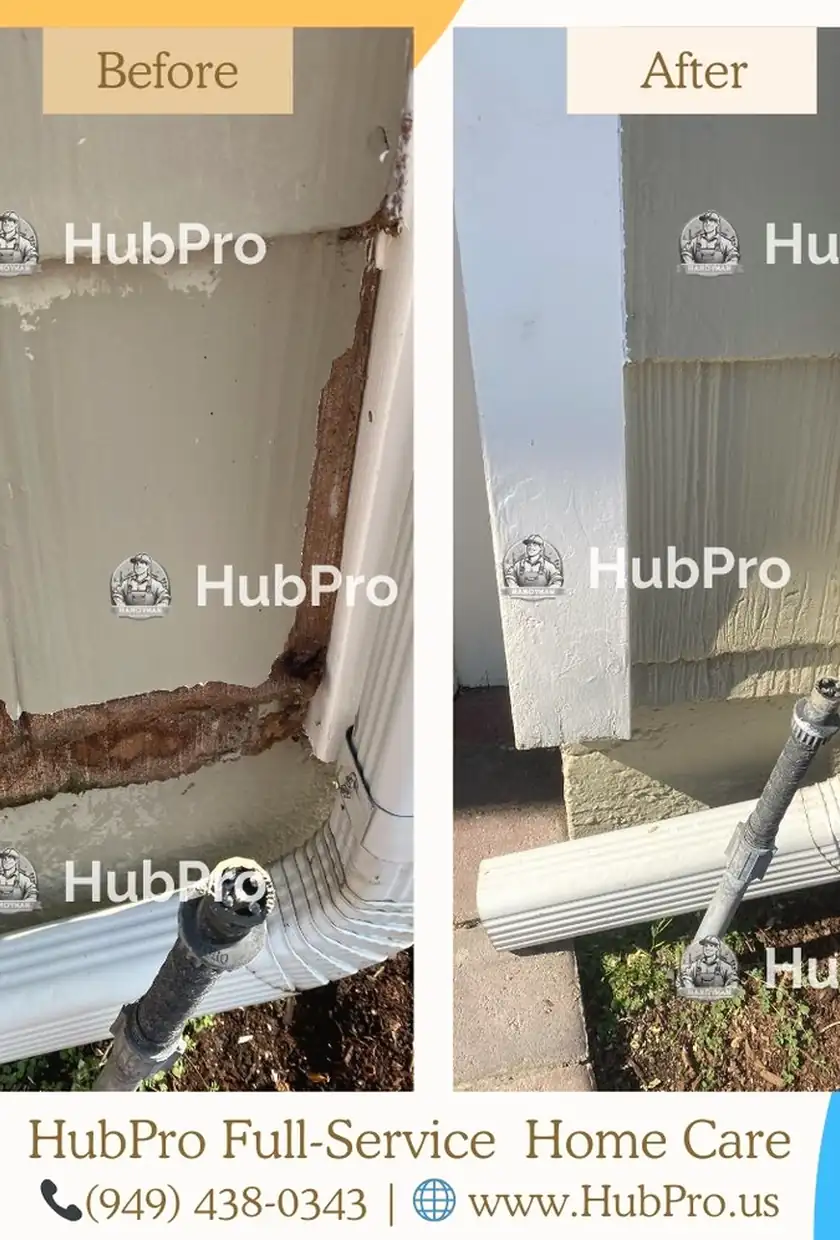
A heavy chair slipped from the sofa and crashed into the drywall, leaving a jagged hole with cracked edges right at eye level. The damage wasn’t just a dent—it tore away the drywall paper and crumbled some of the corner beads, making the wall surface uneven and exposing the wooden stud frame inside. Every time the sun hit that spot, the rough edges cast shadows that made the flaw impossible to ignore.
I tried patching it myself, mixing compound and sanding down the rough spots, but the seams kept shrinking back and the repair stood out like a sore thumb. The paint never quite matched, and under natural light the texture differences screamed "DIY job." Even a small misstep in feathering the joint compound made the patch catch light differently, leaving gradient shadows no matter how many coats I applied.
Calling in a pro for Drywall installation made all the difference. The handyman carefully cut and fitted a new panel, blending compound layers smoothly to eliminate seams and feathering edges with precise sanding. They controlled dust thoroughly, leaving the space clean, and finished with paint matched so well that the patch vanished from view, flat and even under every light source. This small but intricate job was done right the first time—no callbacks, no creeping edges—just a flawless wall as if the hole had never been there.
Common homeowner questions about visible wall damage from Drywall installation in Mission Viejo and the challenges of proper repair methods.
Fresh drywall compound can appear smooth when wet, but as it dries, it shrinks and may reveal seams or unevenness. If ignored, these imperfections get worse, creating a more obvious patch that needs re-sanding and additional coats for a clean, stable finish.
Even after painting, a patch can stand out because the texture or drywall mud didn’t blend well with the surrounding wall. Light hitting the surface can highlight edges or areas that didn't feather properly. A proper fix involves careful sanding and matching the original wall texture before painting.
DIY repairs often miss subtle details like feathering edges or correct mud drying times, which leads to patches that come back or stay visible. Professional Drywall installation in Mission Viejo ensures clean work, stable results, and no callbacks by handling all these nuances precisely.
Visible damage often hides underlying issues like loose drywall or uneven framing. Skipping these leads to patches that don’t hold or look right. True repair involves prep work, multiple coats, detailed sanding, and texture matching—steps that ensure a durable fix worth the investment.
When cracks keep reappearing or damage is large, patching alone won’t hold. Problems like movement behind the wall or moisture require removing damaged sections and reinstalling drywall. This prevents the patch from failing again and delivers a clean, long-lasting surface.
Wall textures vary and are affected by light direction and finish. If the repair mud isn’t blended with matching tools or techniques, the patch can look rough or too smooth. Correct repair means matching texture carefully under natural light to avoid patchy spots.
A lasting repair requires addressing the root cause, using proper joint compounds, and careful sanding and blending. Poorly done patches crack or peel over time. Hiring someone familiar with Drywall installation in Mission Viejo usually means a clean, stable repair that stands up to everyday wear.
Our drywall repair work is centered in Mission Viejo, where small patches, finish work, and visible wall damage get quick focused attention. Because these jobs often require short visits or follow-ups, we keep travel times manageable within Orange County. Nearby stops usually happen in areas like Lake Forest and Rancho Santa Margarita, letting us cluster jobs efficiently and keep scheduling smooth without affecting repair quality.
To keep a practical workflow beyond Mission Viejo, we typically include nearby communities within a reasonable drive, helping coordinate repair tasks with nearby needs. Lake Forest and Rancho Santa Margarita.
When you notice patched or cracked drywall from day-to-day wear, we handle the repair and installation with care, ensuring walls look smooth and solid again. Around Mission Viejo, quick turnarounds on smaller drywall jobs mean your home won’t wait long for those visible fixes that matter most.
Homeowners often ask about these drywall issues during the same visit.
HubPro also handles these home repair tasks in Mission Viejo when you need more than drywall repair.
In Mission Viejo homes, Drywall installation can begin with subtle issues that escalate over time. What starts as small imperfections often reveal deeper problems as the damage worsens.
A careless bump of a door handle or shifting furniture leaves small dents or cracks, subtle flaws that often go unnoticed until they spread into more visible fractures.
Carving holes for plumbing or electrical wires creates irregular openings with jagged edges, compromising the smooth surface and weakening the drywall’s integrity around those areas.
Removing heavy TV brackets or loose anchors can pull chunks out of the wall, leaving uneven holes and broken texture that don’t simply fill in without drawing attention.
Natural shifts in the home cause minor cracks along corners and seams, creating fragile edges and spreading splits that worsen over time if left unchecked.
In Mission Viejo, Drywall installation often uncovers unique challenges like visible patches or mismatched textures that impact pricing. What you see now directly affects the repair process and cost.
$150+
Cleaning edges and prepping for one coat of compound, then sanding and painting takes time. This upfront care ensures a clean patch without quick fixes that peel.
$280+
Failed DIY attempts often need extra compound layers with drying time between each. Multiple visits allow proper blending to match texture and color, avoiding uneven surfaces.
$420+
Rough openings or mismatched textures require thorough prep, three or more compound passes, and detailed finish work. This ensures a flawless blend, not just filling a hole.
Top-Rated Drywall repair — 5 Stars on Yelp & Google
Expert Drywall installation in Mission Viejo with meticulous attention to detail and lasting finish.
★★★★★
Had a big hole beside the door frame; tried patching myself but it cracked next day. Their drywall repair services fixed it clean with no visible edges and they kept the dust contained.
Anna L
★★★★★
A dent from moving furniture left the wall uneven. They didn’t rush drying and came back for a second pass to blend the texture perfectly so it doesn’t catch light now.
Marco
★★★★★
Previous DIY patch peeled, especially around the seams. The handyman explained every step, sanded carefully, and the surface finish fits seamlessly with the original paint.
Chris D
★★★★★
I found a drywall patch near me for a soft, sagging spot which ended up needing more than a patch. They removed damaged drywall and installed a sturdy replacement with clean edges.
Jill S.
★★★★★
Paint mismatch was driving me nuts after a quick fix. They matched the drywall and paint flawlessly, showed up on time, and ensured no callbacks were needed—a noticeable fix.
Steven M
★★★★★
The texture on my repaired wall was off before—they carefully sanded and feathered the finish. They even kept me updated on drying times and cleaned the work area well.
Elaine Wright
★★★★★
Had a rough spot from an old patch job. This crew controlled dust perfectly, explained the whole process, and the wall now has a smooth finish that doesn’t draw attention anymore.
Matt P
★★★★★
I’m a repeat customer because they never hurry drying. The last time, they patched a tricky corner dent, came back for a second coat, and the repair looks like part of the wall now.
Lauren K
Our Drywall installation process in Mission Viejo fixes impact damage, rough patches, and visible seams by carefully stabilizing and matching every surface detail for a flawless finish.
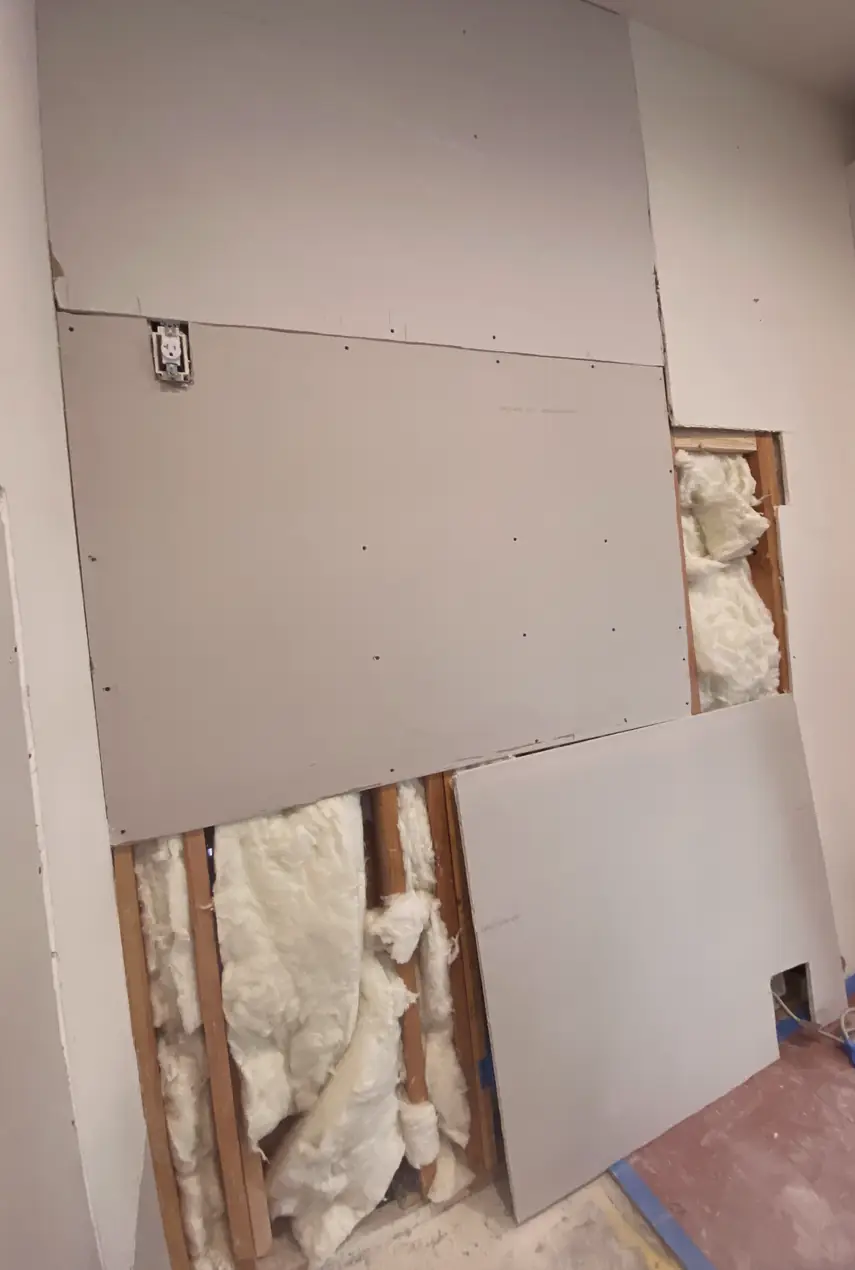
We start by precisely cutting out unstable drywall and cleaning the edges to prevent future shrinking or cracking. DIY often overlooks this, causing uneven surfaces and weak spots that show under light.
Next, a custom-cut patch is anchored tightly into place to fill the cleaned damage area. Without this, patches can flex or protrude, creating visible bumps or gaps that catch shadows.
We build up joint compound in thin, controlled coats, allowing proper drying between each. Rushed drying or thick application often leads to cracking or shrinkage that DIY repairs can't hide.
After full drying, sanding smooths the surface and gently blends edges into surrounding walls. Skipping careful feathering causes sharp lines and visible seams, especially when light grazes the area.
Finally, we replicate the existing wall texture and blend paint expertly to erase all signs of repair. Poor texture matching or paint flashing often reveals the patch when light reflects.
Throughout, dust is minimized and progress inspected for stable, clean patches that need no callbacks. Proper sequence and attention ensure the repair is invisible, not just concealed.