Yelp
★★★★★
Had a big door hole that made the frame weak. Tried fixing myself but it sank the next day. They came back for second pass, no callbacks.
Sophia M
Local Drywall repair Service
You just noticed that jagged hole near the corner of your wall, the paint cracked and peeling around the rough edges. It’s tempting to patch it yourself, but Drywall installation in Brea isn’t as simple as slapping on some mud—any quick fix leaves uneven surfaces and patches that stand out, failing to restore the smooth look you want.
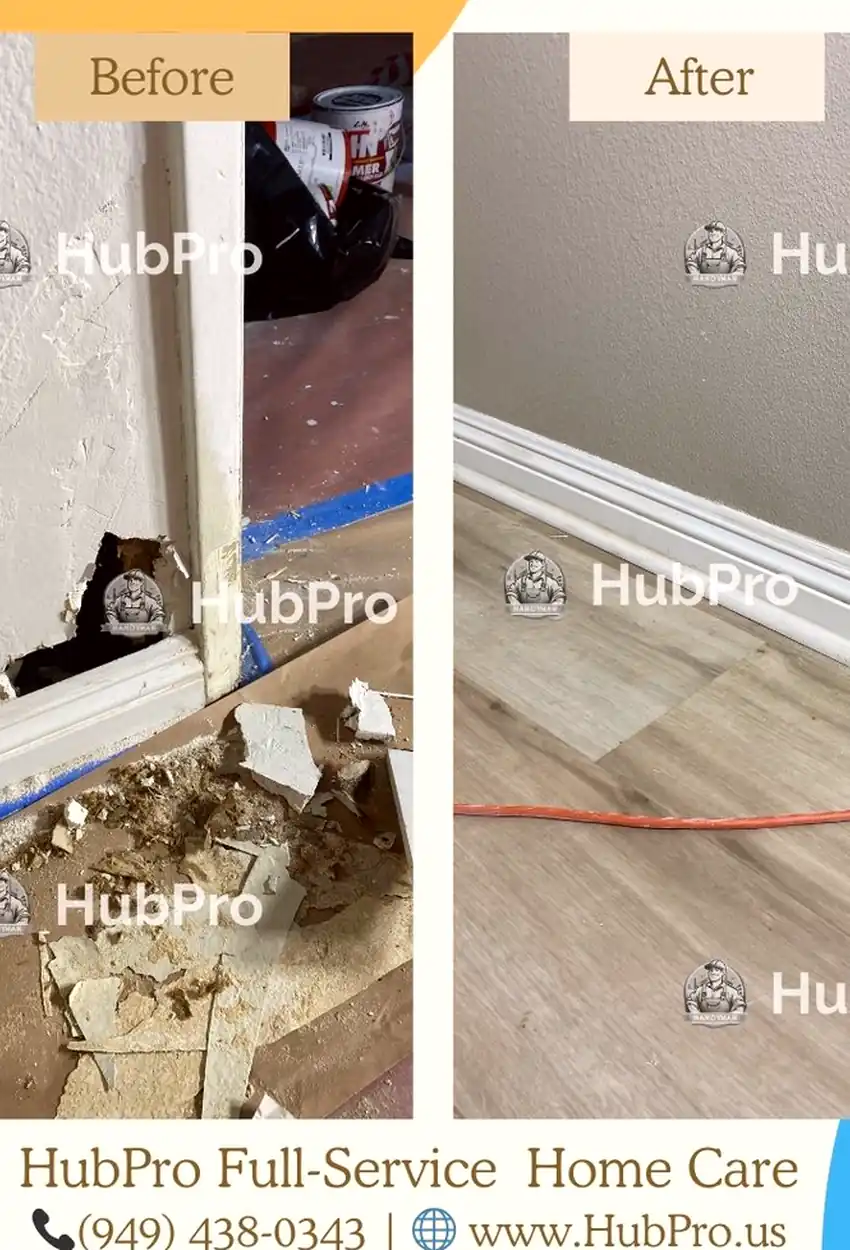
It started with a heavy hit against the corner by a moving couch—deep gouge and broken edges where the drywall paper frayed and crumbled. The hole wasn’t large, but the jagged break left the wall vulnerable, drawing every eye in low sunlight to that glaring imperfection. The rough patch stuck out, and the cracked plaster dust settled unevenly onto the floor. I knew it wasn’t going to fix itself.
Trying to patch it myself, I mixed joint compound and slapped on the first layer, hoping that sanding would smooth the transition. Instead, the seams shrank as the compound dried, leaving visible dips and flashing the mismatched texture under different angles of light. No matter how much sanding I did, the repaired spot caught shadows and looked off—nothing like the flat, blended wall I wanted. It quickly became clear that a simple touch-up wasn’t going to cut it for this corner where light and texture played tricks on the eye.
Calling in professional help for Drywall installation made all the difference. The handyman carefully cut out the damaged drywall section, installed a matching piece with precision-cut edges, and feathered compound layers meticulously. Using controlled sanding and paint blending, they ensured dust was contained and the wall surface stayed clean throughout. The final result is flawless—no visible patches, no shadow lines, perfectly flat from every angle. It’s the kind of repair that stays invisible and never needs a second visit, done right the first time.
Top-Rated Drywall repair — 5 Stars on Yelp & Google
Experienced handyman for Drywall installation in Brea, handling every repair and finish with precision and care, no shortcuts.
★★★★★
Had a big door hole that made the frame weak. Tried fixing myself but it sank the next day. They came back for second pass, no callbacks.
Sophia M
★★★★★
The drywall patch near me team showed up on time and explained the cracked edge repair thoroughly. They controlled dust well and kept things tidy.
Lucas B
★★★★★
I thought my paint mismatch was fine after a DIY patch but it looked worse under light. The pros handled drywall and paint blending like it belonged there.
Emma R
★★★★★
Previous drywall repair services left uneven texture near the corner. This crew sanded and blended flawlessly, though it took a couple of drying rounds.
Chris D
★★★★★
Soft drywall around bathroom damaged from moisture. Tried a quick patch, but it cracked again. The handyman did sheetrock repair that held firm and neat.
Julia H
★★★★★
A bad patch from before was obvious, seams raised and paint flashing oddly. They fixed the texture match perfectly, didn't rush drying and finished neat.
Anthony J
★★★★★
Had a dent that I taped over, but dust spread everywhere. This team controlled dust masterfully and showed up on time. Felt like a fresh wall after.
Nina K
★★★★★
I’m a repeat customer; their Drywall installation in Brea work last year was great. This time they fixed a large wall dent, patiently explained everything.
Henry L
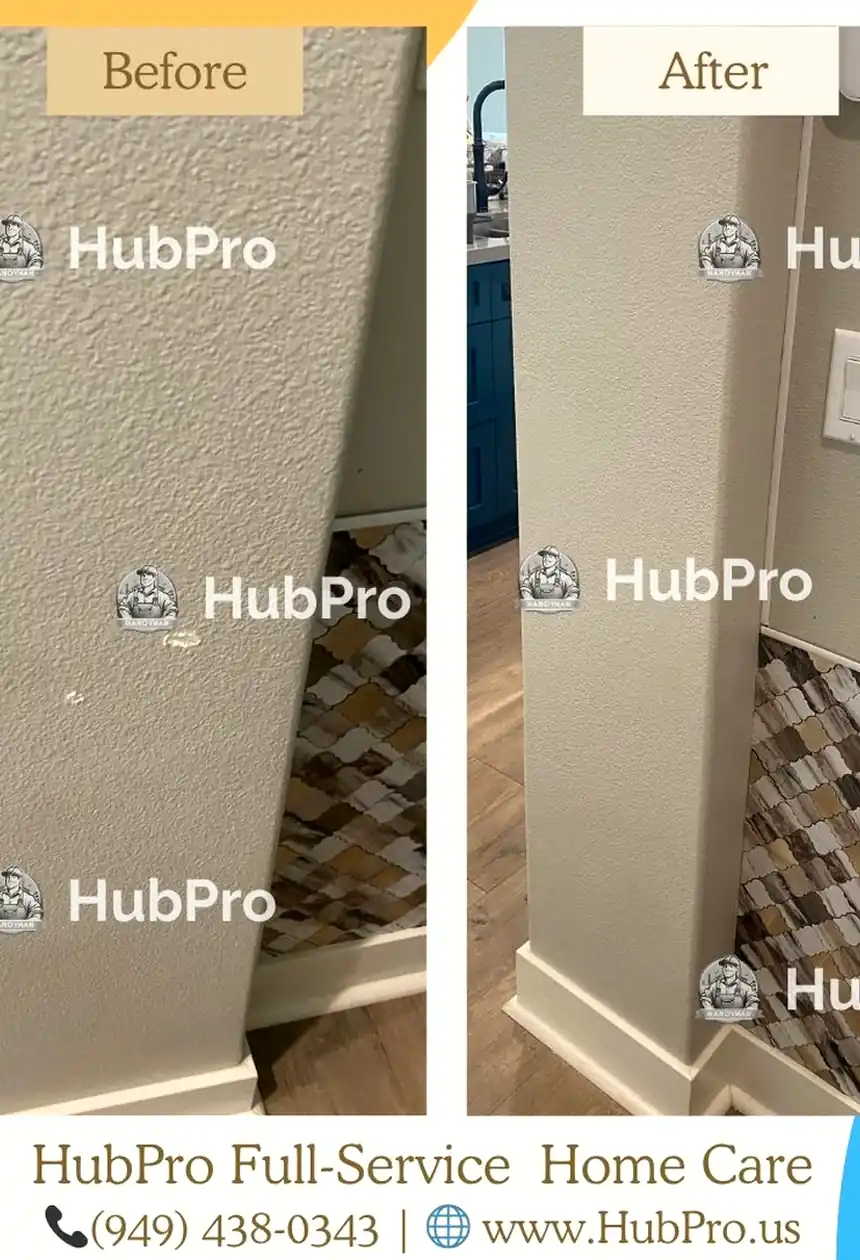
Our Drywall installation process carefully addresses impact damage, rough patches, and visible seams to restore your wall’s smooth, flawless finish.
We start by cutting out loose or cracked drywall around impact spots to create a stable base. DIY often misses hidden weak spots, causing shrinkage or cracks later.
Next, we fit a custom drywall patch that matches the wall thickness perfectly. Rushed DIY patches can cause uneven surfaces and noticeable edges under light.
We build up joint compound in thin, controlled coats with proper drying time to avoid cracking or shrinkage. Skipping proper drying leads to rough spots and visible seams.
Using fine-grit sanding and feathered edges, we eliminate ridges and blend the patch invisibly. DIY sanding often leaves scratches or sharp lines that catch shadows.
Finally, we replicate the wall texture and use paint blending techniques that prevent flashing or color shifts. Inconsistent touch-ups create glare differences under direct light.
Throughout, we maintain a dust-controlled workspace and clean up meticulously to avoid debris interfering with adhesion, guaranteeing a stable, no-callback repair.
Real homeowner questions about Drywall installation in Brea after visible wall damage reveal why patches fail, drying issues, and when to call a pro.
When a drywall patch looks smooth while wet but shrinks and cracks next day, it's because the compound lost moisture unevenly. If ignored, cracks deepen and become more visible. Proper fix involves applying thin coats, letting each fully dry, then sanding and blending to the wall’s texture to avoid future shrinkage.
If the patch shows after painting, it usually means the area wasn't sanded or textured to match the original wall. Light hitting the edges exposes uneven surfaces. Ignoring this makes damage obvious. A real fix blends texture carefully with sanding, skim coating, and repainting in layers to assure a seamless look.
DIY often misses critical steps like correct drying times and texture blending, leading to repeated failure and visible patches, especially under side lighting. A pro ensures clean work with no callbacks by prepping, applying, sanding, and painting properly, giving a stable, long-lasting repair that’s hard to notice.
Many think drywall repair is cheap because of material cost, but most expense is skilled labor. Proper drying, sanding, texture matching, and paint blending take time and experience. Skipping these leads to failing patches that cost more later. Investing in a well-done repair prevents frustration and multiple fixes.
If damage is deep, cracks appear again, or edges show clearly, a small patch won’t hold. The area needs proper drywall replacement and taping behind the scene to stabilize it. Leaving it patched under tension causes the problem to come back. A thorough fix stops recurring damage and gives clean, even walls.
Drywall texture varies by wall and light angle exposes any mismatch on repairs. A patch with different grain or thickness looks obvious when side light hits it. Ignoring texture blending makes flaws permanent. Correct repair includes mimicking the existing texture and carefully feathering edges, so light doesn’t highlight the patch.
Quick patches that skip proper drying, sanding, or blending soon crack or peel because they're not stable. Proper Drywall installation in Brea includes solid taping, multiple dry coats, texture matching, and paint blending, giving a durable fix with clean work and no callbacks. Cutting corners shortens lifespan.
Our drywall repair work is centered in Brea, focusing on fixing visible wall damage, patchwork, and finish work mostly within a short drive. Since many jobs are small and may need follow-up visits, we cluster repairs in nearby spots around Orange County to keep things efficient and flexible. Travel time influences how we schedule return trips and handle repairs outside town.
Beyond Brea, we often take on drywall repairs in neighboring communities where short drives make scheduling small repairs practical and efficient. Fullerton and Placentia.
When walls show dents or holes, we step in to patch and smooth surfaces quickly. Whether in Brea or nearby neighborhoods, small drywall repairs and fresh installations are handled promptly, keeping your walls looking seamless without long waits or hassle.
Homeowners often ask about these drywall issues during the same visit.
HubPro also handles these home repair tasks in Brea when you need more than drywall repair.
In Brea homes, Drywall installation issues often start small before escalating. What begins as minor scuffs can evolve into more intrusive damage that's tough to disguise, showing why early signs matter.
Repeated contact from door handles leaves marks and shallow dents on drywall surfaces. These impact spots might look minor initially but often develop into chipped paint and surface cracks that catch the eye.
Accessing plumbing or electrical lines frequently necessitates cutting drywall, creating uneven edges and ragged holes. These patches rarely match perfectly, making the damage visibly noticeable long after the work is done.
Heavy TV brackets or shelves strain anchor points, sometimes pulling chunks of drywall from the wall. The resulting holes often expose the interior, leaving awkward shattered textures around mounting spots.
As walls settle or shift slightly, minor cracks and corner breaks appear. These fissures may start thin but tend to widen over time, disrupting wallpaper or paint and creating uneven wall surfaces.
Drywall installation in Brea isn't just patching holes; it involves addressing visible patches, failed DIY attempts, rough openings, and mismatched textures, ensuring a seamless finish that lasts.
$150+
This level covers visible patches with basic prep and one compound layer. Quick drying and a single visit focus on clean edges for a neat, invisible fix.
$280+
Failed DIY spots require more thorough prep, sanding, and two compound layers with extended drying times, plus a follow-up visit for texture blending that matches perfectly.
$420+
Rough openings or mismatched textures need multiple compound passes, more drying cycles, and several visits to feather edges and finish flawlessly for no visible trace.